I am not sure why it took me so long to make this… For real. My original intent was to cook everything in the big dutch oven, and then transfer to a baking dish, cover with the crust, and bake. Um, no. WARNING – this recipe makes a lot. But, it is fantastically delicious, so that’s probably more of a good thing. The pack of vegetables I used definitely made the amount of filling much larger than I had anticipated, but never you mind. Now that it is getting chilly (after being 80* a few days ago… again), this is the perfect meal to make on a Sunday afternoon. Remember – it’s even better the next day. And the next. Mayyyybe even the next. Hey, that’s what freezers are for, right?

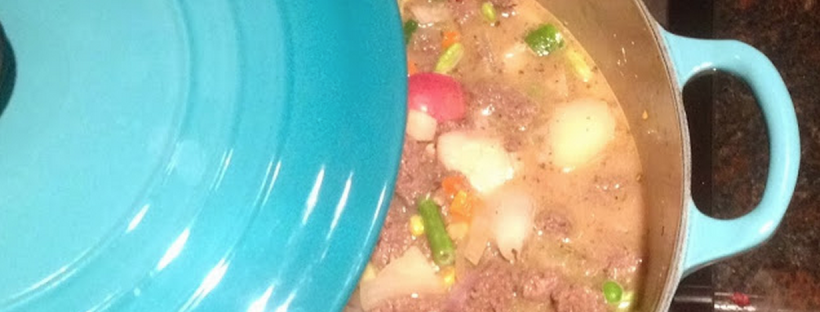
2. In the same pot, add 1/2 of the butter and cook the diced onion over medium heat until it starts to soften – 5 or 6 minutes. Once it has softened, season with salt and pepper, add the Worcestershire, and cook for a few more minutes, then add the rest of the vegetables and the cooked potatoes to let them heat through. Taste them to see if they need more s&p.

3. In the mean time, mix the corn starch and milk together in a separate bowl, whisking to combine. Once the veggies have warmed up, add the corn starch/milk mixture, and give it a Big Spur big stir. After a minute or two, add the meat back into the pot, followed by the red wine, and stir again. Lastly, add the stock, and give it one last good mix. {I said +/- 3 cups, as it is just based on how much meat/veggies you have. Add enough stock to just cover everything.} Then cover the pot, put the burner on low, and let it do its thing for 10 minutes or so, allowing the liquid to reduce and become nice and thick. You’ll know you’re good to go when you can coat the back of a wooden spoon, leaving a layer of goodness behind. While that’s happening, preheat your oven to 400*. Yowzers.

4. Now it’s time for that “crust.” You see, I’d only purchased 1 can of crescent dough – This was back when I thought I was making just enough filling to fill 1 baking dish. Now the whole 1.5 cans/ refrigerated pie crust thing makes sense, doesn’t it? Or, you could just use one can, and have your crust look like this.

Ehhh. Sorry. Back to the task at hand. Pull the dough apart at a few of the perforations, then use your fingers to press them back together into the shapes you need to cover the top of the filling. It’s a bit of a process, but so much easier than making your own dough. Which you could totally do… Which I probably should have done since my topping looked like a Picasso meal gone bad… Wait, what?
5. In a small bowl, whisk the egg together with a dash of water, then brush over the top of the dough. Take your pepper grinder, and get to grinding. I’d say I went over the dough 3 or so times to get the right amount of pepper. You should be able to taste it in every bite. If you have enough dough to cover the whole thing, pinch it to the sides to seal it, and poke a few holes in the top to allow steam to escape. I did not have that issue, but you’ll probably do a much better job…
6. Put the lid on the pot, and stick that heavy thing in the oven. After 15-18 minutes, check on the dough to see that it has started to rise from cooking (it will still look raw on the top, but will have started to puff up). Keeping the lid off, allow it to cook for 5 more minutes before checking on it again. You’ll know it’s ready when the crust is golden brown, like one giant biscuit top. If it needs longer than 5 minutes, check back ever 2-3, until it looks like this:

I guess it isn’t a complete disaster after it bakes…
7. Now get that monster {carefully} out of the oven, and let it cool for a few minutes. Trust me when I say carefully. It a.) weighs as much as Marmaduke, and b.) is the same temperature as the surface of the sun. Exaggerate? I never!
Now it’s time to dig in! Load up your bowl with a few heaping spoonfuls of the filling, and scoop yourself a big chuck of that black pepper crust to mop up the extra flavor.

